Merchant Fulfillment API v0 Use Case Guide
Build applications for sellers to purchase shipping for non-Prime and Prime orders using Amazon’s Buy Shipping Services.
API Version: v0
What is the Merchant Fulfillment API?
Use the Merchant Fulfillment API to build applications for sellers to use Amazon's Buy Shipping services to purchase shipping for non-Prime and Prime orders.
You can build applications that can:
- Preview shipping service offers based on shipping requirements, such as ship date, must arrive by date, package size, and weight.
- Create shipments based on seller-selected shipping service offers.
- Automatically pay for shipping through the API service.
- Receive and print shipping labels.
Check the roles you have linked to your profile
Your access to Amazon SP API data depends on the roles you have linked to your Developer Profile and Application. For more information, refer to Roles in the Selling Partner API.
Terminology
| Term | Definition |
|---|---|
| Shipping service | A carrier’s shipping service, such as UPS Ground or FedEx Standard Overnight. Identified with a ShippingServiceId value, which is returned by the getEligibleShipmentServices operation. |
| Shipping service offer | A shipping service offer made by a carrier. It is represented by the ShippingService datatype and identified with a ShippingServiceOfferId value, which is returned by the getEligibleShipmentServices operation. |
| Package | A parcel you want a carrier to ship. The package parameter includes metadata, such as dimensions, weight, and item contents. |
| Shipment | A package and shipping label. It is identified with a ShipmentId value. |
| Additional seller inputs | Additional seller-provided information that is required to purchase certain shipping services. You can call the getAdditionalSellerInputs operation to find out which additional seller inputs are required for a specific shipping service. After you get these additional seller inputs from the seller, you can use the inputs for the createShipment operation to purchase the shipping service. |
| Benefits | An object that contains a list of included Amazon benefits and a list of excluded Amazon benefits from a shipping service offer. Each excluded benefit has a list of reason codes for why it is excluded. |
Tutorial 1: Fulfill Seller Fulfilled Prime and non-Prime orders
Amazon recommends that you use this Merchant Fulfillment service workflow to fulfill Seller Fulfilled Prime orders. This workflow is meant to supplement an order fulfillment system. The order fulfillment system retrieves scheduled order reports that use the Reports service. Incoming orders that are not fulfilled using the workflow described here must be fulfilled by the seller using a different method.
Prerequisites
To complete this tutorial, you need::
- Authorization from the selling partner for whom you are making calls. Refer to Authorizing Selling Partner API applications for more information.
- Approval for the Direct to Consumer Shipping (Restricted) role in your developer profile.
- The Direct to Consumer Shipping (Restricted) role selected in the App registration page for your application.
- Sellers who use an application that you develop based on this workflow must add these columns to their order reports. They can use the optional columns area of the Add or remove order report columns in Seller Central.
Important
Incoming XML order reports must contain
IsPrimeandLatestShipDate. Incoming flat file order reports must containis-primeandlatest-ship-date.
Step 1. Identify orders and retrieve information
Identify new orders by monitoring ORDER_CHANGE notifications. To subscribe to MFN Notifications, refer to Tutorial 5: Subscribe to MFN Notifications. Alternatively, you can identify new orders from incoming order reports.
Retrieve the order information through the Orders API. Prime orders have the IsPrime attribute marked as true. Make sure that the FulfillmentChannels attribute is MFN.
Do not use the FulfillmentServiceLevel attribute or the ship-service-level column in order reports to identify Prime orders.
Code Sample:
Step 2. Determine the latest ship date for the Prime orders
Use the LatestShipDate attribute or the latest-ship-date column from a flat file order report to determine the date by which the Prime orders need to be shipped.
Step 3. Check inventory and validate order
Check the inventory number and make sure that the received order is ready for fulfillment.
Code Sample:
Step 4. Get shipping service offers
Call the getEligibleShipmentServices operation to get the shipping service offers for the orders identified in Step 1, then select one that matches your priorities (for example, cheapest or fastest).
Dos and Don'ts when fulfilling Seller Fulfilled Prime and non-Prime orders
- Do use the
LatestShipDateattribute from the Orders API or thelatest-ship-datevalue from the order report for theShipDateparameter.- Don't specify the
MustArriveByDateparameter, as this will unnecessarily limit the number of shipping service offers that are returned.- Do save the
ShippingServiceIdvalue from each shipping service offer that is returned. You will use this for subsequent calls to thecreateShipmentoperation when you create shipments for specific shipping service offers.- Do check the included and excluded
Benefitsbefore you select a shipping service offer.
Code Samples:
Step 5. (Optional) Declare dangerous goods
If your order contains dangerous goods, they must be declared so they can be handled properly. Dangerous goods attributes are collected on each item. As a shipper, you must provide these attributes. Amazon does not provide a way to find these attributes for your item.
Note
Some carriers have additional requirements for shipping dangerous goods. Check with your carrier to ensure that your shipments meet their requirements.
Request
The following example is a request for Amazon Shipping that includes dangerous goods attributes. For more information on each attribute, refer to the Merchant Fulfillment API v0 reference.
Request example
{
    "ShipmentRequestDetails": {
        "AmazonOrderId": "903-3489051-5871062",
        "ItemList": [{
            "OrderItemId": "6220427528165",
            "Quantity": 1,
            "IsHazmat": true,
            "LiquidVolume": {
                "Unit": "C",
                "Value": 3
            },
            "DangerousGoodsDetails": {
                "UnitedNationsRegulatoryId": "UN1090",
                "TransportationRegulatoryClass": "3",
                "PackingGroup": "III",
                "PackingInstruction": "PI965_SECTION_IA"
            }
        }],
        "ShipFromAddress": {
            "Name": "John Doe",
            "AddressLine1": "300 Turnbull Ave",
            "Email": "[email protected]",
            "City": "Detroit",
            "StateOrProvinceCode": "MI",
            "PostalCode": "48123",
            "CountryCode": "US",
            "Phone": "7132341234"
        },
        "PackageDimensions": {
            "Length": 10.25,
            "Width": 10.25,
            "Height": 10.25,
            "Unit": "inches"
        },
        "Weight": {
            "Value": 10.25,
            "Unit": "oz"
        },
        "ShippingServiceOptions": {
            "DeliveryExperience": "DeliveryConfirmationWithoutSignature",
            "CarrierWillPickUp": false,
            "CarrierWillPickUpOption": "NoPreference"
        }
    }
}
Step 6. Create a shipment
After you choose the shipment service that best matches your use case, call the createShipment operation for one of the shipping service offers that was returned in the previous step.
Use the following parameter values:
ShipmentRequestDetails: Use the same values that you included in yourgetEligibleShipmentServicescall in Step 4.
Important
Make sure you include the dangerous goods attributes for your item (refer to Step 5). You must declare dangerous goods so that they can be properly handled.
ShippingServiceId: Use the value associated with this shipping service offer.
The createShipment operation starts the payment process for shipping, which deducts from the seller’s Amazon seller account and confirms the shipment.
Save the item list and shipment ID
Save the
ShipmentIdvalue returned by thecreateShipmentoperation. If the seller wants to print a new label, cancel a shipment, or check shipment status at a later time, theShipmentIdis used to identify the shipment. Save the item list along with each shipment ID.
Code Sample:
Step 7. Extract and print the shipping label
Extract the shipping label from the Label attribute returned by the createShipment operation. Print or store the shipping label.
For more information, refer to Tutorial 3: Manipulate shipping labels.
Code Samples:
Step 8. Create shipments for the remaining orders
Repeat Steps 3 through 5 until you have created shipments for the orders identified in Step 1.
Tutorial 2: Cancel a shipment
This tutorial demonstrates how to add functionality to the workflow described in How to fulfill Seller Fulfilled Prime orders.
Step 1. Call the cancelShipment operation
cancelShipment operationCall the cancelShipment operation and specify the ShipmentId value of the shipment you want to cancel.
This returns the details of a shipment, which includes the shipment status. It might also return one or more unexpected errors occurred during the cancelShipment operation.
Step 2. (Optional) Check the status of the canceled shipment
- Call the
getShipmentoperation and specify theShipmentIdvalue for the canceled shipment. - Get the cancellation status from the status element returned by the
getShipmentoperation.
Errors
The service returns the
LabelCancelWindowExpirederror if the allotted time period for canceling a label has expired. Refer to Error codes.
Tutorial 3: Manipulate shipping labels
The createShipment and getShipment operations return a shipping label file in PDF, PNG, or ZPL format, depending on the carrier. Amazon compresses the document data before it returns it as a Base64-encoded string.
Extract document data from a compressed file
- Decode the Base64-encoded string.
- Save the decoded string with a
.gzipextension. - Extract the PDF, PNG, or ZPL file from the GZIP file.
createShipment and getShipment also return a Base64-encoded MD5 hash to validate the document data.
Reprint a shipping label
- Call the
getShipmentoperation and include theShipmentIdfor the shipment that requires the shipping label. - Extract and print the shipping label from the
FileContentselement that is returned by thegetShipmentoperation.
Tutorial 4: Include additional seller input data
The getAdditionalSellerInputs operation returns a list of additional inputs that are required from the seller to purchase shipping for some shipping services. It is only required for shipment services that require additional seller inputs.
Step 1. Determine if the shipment service requires additional seller inputs
- Call the
getEligibleShipmentServicesoperation. - Retrieve the list of
ShippingServicesreturned by the operation. - Check for the
RequiresAdditionalSellerInputsattribute. - If
RequiresAdditionalSellerInputsistrue, it means the shipment service requires additional seller inputs.
Step 2. Call the getAdditionalSellerInputs operation
getAdditionalSellerInputs operationIf the shipment service requires additional seller inputs, call the getAdditionalSellerInputs operation and include all required parameters. The response includes a list of required parameters that a seller must include if they want to purchase shipping services.
Step 3. Review the additional seller inputs required
- Examine the response from the
getAdditionalSellerInputsoperation. - Identify the specific additional seller inputs that are required.
Step 4. Provide the required seller inputs
- Collect the necessary information based on the additional seller inputs identified in the response.
- Ensure the information provided meets the syntax requirements specified in the response.
- Prepare the required seller inputs for the next step.
Step 5. Create the shipment
- If the required seller inputs are collected and prepared, call the
createShipmentoperation. - Use the necessary parameters and seller inputs with the
createShipmentoperation. - Follow the appropriate syntax requirements for the seller inputs in the
getAdditionalSellerInputsresponse.
Step 6: (Optional) Retrieve saved values
The getAdditionalSellerInputs operation returns saved values previously provided to Amazon. To access these saved values, examine the response from the getAdditionalSellerInputs operation.
Tutorial 5: Subscribe to MFN notifications
You can use the Selling Partner API for Notifications to subscribe to notifications that are relevant to a selling partner's business. With this API, you can create a destination to receive, subscribe, and delete notification subscriptions. Instead of polling for information, your application can receive information directly from Amazon when an event activates a notification to which you are subscribed.
Important
Sellers can subscribe to the
ORDER_CHANGEnotification, which is sent whenever there is an order availability status change.The
MFN_ORDER_STATUS_CHANGEandORDER_STATUS_CHANGEnotification types have been removed. Please update your applications to use theORDER_CHANGEnotification. [ORDER_CHANGE]((https://developer-docs.amazon.com/sp-api/docs/notifications-api-v1-use-case-guide#order_change) sends an order-level payload whenever there is an important change in the order. Important changes include order status changes and buyer requested cancellations. For detailed information about SP-API deprecation dates, refer to the deprecations table.
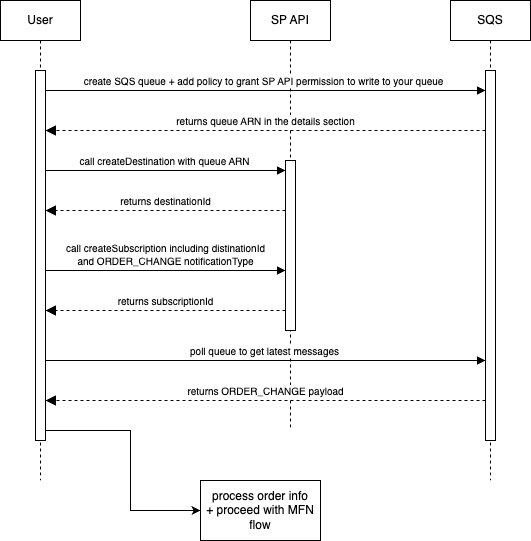
Step 1. Subscribe to the ORDER_CHANGE notification
ORDER_CHANGE notificationTo set up and subscribe to the ORDER_CHANGE notification, follow the Notifications API SQS Tutorial. The following figure provides an illustrated overview of the tutorial.
Step 2. Poll the queue to retrieve the latest ORDER_CHANGE messages
ORDER_CHANGE messages- Retrieve the queue URL: Connect to the SQS service and retrieve the URL for the queue that receives the
ORDER_CHANGEmessages. This URL uniquely identifies the queue and is used to interact with it. - Configure polling parameters: Review the polling parameters to determine how frequently and how many messages to retrieve at a time. This includes the wait time between subsequent polling attempts and the maximum number of messages to retrieve in each request.
- Poll the queue: To poll the queue, send the requests to retrieve the messages. Use the
ReceiveMessageoperation to retrieve the messages from the queue. When you call this operation, you can specify the queue URL, maximum number of messages to retrieve, and other optional parameters, such as visibility timeout.
Alternatively, you can configure event source mapping to automatically invoke a Lambda function when new messages arrive to the SQS queue. For more information on event source mapping, refer to Tutorial: Using Lambda with Amazon SQS.
4. Process the messages: When you receive the messages, you can process them according to your application's requirements. In the case of ORDER_CHANGE messages from the SP-API, you can extract the relevant information, such as the order ID, status change details, and timestamps.
5. Delete processed messages: After each message is successfully processed, make sure to delete it from the queue with the DeleteMessage operation provided by SQS. This step ensures that the processed messages are removed from the queue and won't be retrieved again in subsequent polling attempts.
Step 3. Process the order information and call shipment services
The ORDER_CHANGE notification returns high-level information related to the order, such as the OrderId, OrderItemId and the OrderStatus. To learn more about response attributes, refer to ORDER_CHANGE notifications.
To automate the fulfillment process, you must:
- Check notification messages with an
OrderStatusofUpComing,Pending, orUnshipped. Check thatMFNis within theFulfillmentChannelattribute. - Retrieve order and shipping information with the
getOrderoperation. - Pass this information to the
getEligibileShipmentServicesoperation and follow the steps in Tutorial 1.
Error codes
The following table describes the Merchant Fulfillment error codes.
| Error code | HTTP status code | Description |
|---|---|---|
InsufficientFunds | 400 | The requested shipping label purchase was rejected because of insufficient funds in the seller’s account. |
InvalidRequest | 400 | Request has missing or invalid parameters and cannot be parsed. |
InvalidShipFromAddress | 400 | The specified ShipFromAddress value is invalid. Specify a valid address. |
InvalidShippingServiceOfferId | 400 | The specified ShippingServiceOfferId value is invalid. Specify a ShippingServiceOfferId value returned by a previous call to the getEligibleShipmentServices operation. |
LabelCancelWindowExpired | 400 | The cancellation window for requesting a label refund has expired. Cancellation policies vary by carrier. For more information about carrier cancellation policies, refer to the Seller Central Help Hub for your marketplace. |
LabelFormatNotSupported | 400 | The requested LabelFormat does not match the available formats. |
ShipmentAlreadyExists | 400 | One or more items specified in a call to the createShipment operation have already shipped. Specify only unshipped items. A ShipmentId is returned in the Message element of the error message for each specified item that has already shipped. |
ShipmentRequestDetailsTooRestrictive | 400 | The specified ShipmentRequestDetails and ShippingServiceI values are so restrictive that no shipping service offer is available that can fulfill the request. Try calling the createShipment operation again with less restrictive values, or first call the getEligibleShipmentServices operation to check if there are any shipping service offers available that match the ShipmentRequestDetails and ShippingServiceId values that you specify. |
ShippingServiceOfferNotAvailable | 400 | The specified ShippingServiceOfferId value is no longer valid. This could be because the shipping rate changed since you received the ShippingServiceOfferId value with a previous call to the getEligibleShipmentServices operation. Call the getEligibleShipmentServices operation again to get a new ShippingServiceOfferId value. |
InvalidState | 404 | The request cannot be applied to the shipment in its current state. For example, a shipment in the RefundApplied state cannot be canceled. |
ItemsNotInOrder | 404 | Items specified in a call to the createShipment operation are not part of the order specified in the same call. |
RegionNotSupported | 404 | The specified order is from a marketplace where the Merchant Fulfillment service is not supported. |
ResourceNotFound | 404 | The specified resource (such as ShipmentId or AmazonOrderId) does not exist. |
ShippingServiceNotAvailable | 404 | The specified shipping service does not exist or is not available for the specified parameters (for example, Weight). |
Updated 4 months ago